Extremely Serious

Category: Git (Page 1 of 2)

Squashing Commits with git merge

Introduction

In Git, squashing commits is a powerful technique that combines multiple commits into a single, more concise commit. This can simplify your project's history and make it easier to review changes. One common method to achieve this is using the git merge --squash command.

Understanding git merge --squash

When you use git merge --squash, Git merges the changes from the source branch into the target branch, but instead of creating a new commit for each merged change, it creates a temporary commit that contains all the changes combined. This temporary commit is not automatically recorded in the history.

Steps to Squash Commits

  1. Switch to the target branch:

    git checkout <target-branch>
  2. Merge the source branch:

    git merge --squash <source-branch>
  3. Review the merged changes:

    git diff
  4. Create the final commit:

    git commit -m "Squashed commits from "

Example

Let's say you have a feature branch named feature-branch and you want to merge its changes into the main branch. Here's how you would use git merge --squash:

git checkout main
git merge --squash feature-branch
git commit -m "Merged feature changes"

Benefits of Squashing Commits

  • Cleaner history: Reduces the number of commits, making it easier to review changes.
  • Improved readability: A concise commit history can be easier to understand and navigate.
  • Simplified code review: Fewer commits to review can streamline the code review process.

When to Squash Commits

  • Small, related changes: If you've made a series of small, related changes, squashing them into a single commit can provide a better overview.
  • Experimental or temporary changes: If you've made changes that were experimental or temporary, squashing them can clean up the history.
  • Before creating a pull request: Squashing commits before submitting a pull request can help keep the review process focused.

Caution:

While squashing commits can be beneficial, it's important to use it judiciously. If you need to track individual commits for debugging or auditing purposes, consider merging normally instead of squashing.

Conclusion

git merge --squash is a valuable tool for maintaining a clean and organized Git history. By understanding how to use it effectively, you can streamline your development workflow and improve the readability of your project's changes.
Set the SSL Backend to use with Git

To provide which ssl backend to use with git use the following syntax:

git config --global http.sslBackend <SSL_BACKEND>

The SSL_BACKEND token can potentially be openssl or schannel.

schannel uses the windows certicate store.

Example

git config --global http.sslBackend schannel

Useful Environment Variable for Git Troubleshooting

VariableDescriptionPossible Values
GIT_CURL_VERBOSETells Git to emit all the messages generated by that library. This is similar to doing curl -v on the command line.1
GIT_SSL_NO_VERIFYTells Git not to verify SSL certificates.true
GIT_TRACEControls general traces1, 2 or true
GIT_TRACE_PACKETEnables packet-level tracing for network operations.true

Squashing Commits Before Pushing a Branch into a Git Upstream

Pre-requisite

  • Git is installed locally.

Procedures

  1. Checkout the non-master branch to be squashed.
  2. Ensure that the branch is up to date from the master.
  3. Open a terminal and change the directory to the root of checked out branch.
  4. Run the following command:
    git rebase -i master
  5. Once a text editor opens and leave the first pick alone and the subsequent picks must be replaced with squash. For example:
    From

    pick < hash1 > < message1 >
    pick < hash2 > < message2 >
    pick < hash3 > < message3 > 
    pick < hash4 > < message4 >
    

    To

    pick < hash1 > < message1 >
    squash < hash2 > < message2 >
    squash < hash3 > < message3 > 
    squash < hash4 > < message4 >
    
  6. Save the update and close the editor.
  7. Another editor will open to update the message since git is about the combine multiple commits.
  8. Update the message if necessary.
  9. Save and close the editor.
  10. If everything went fine your branch is now squashed.

Pushing files with More than 1MB in Size via HTTP in Git

For some reason, you have files with more than 1MB in total size to push to git respository by HTTP. You might be surprised that you cannot do it. This is because by default, git only posts to remote server via HTTP protocol with a maximum of 1MB. To remedy this, increase the http.postBuffer to 500MB (i.e. if you have to send files with 500MB total size) on client side like the following:

git config --global http.postBuffer 524288000

Reference

https://mirrors.edge.kernel.org/pub/software/scm/git/docs/git-config.html

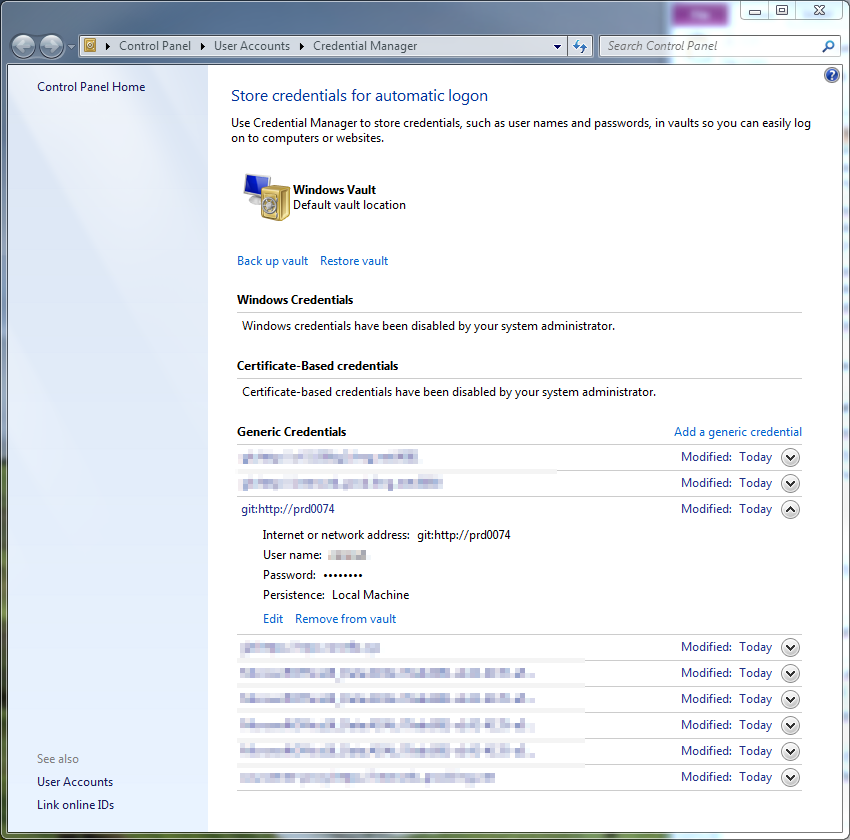
Git for Windows Credentials

The location for git for windows credentials can be found in the Credential Manager of windows. You can use this manager to add, remove or delete a git credential.

This can be accessed from the Control Panel then click the User Accounts. From there, click Credential Manager.

Control Panel -> User Accounts -> Credential Manager

Normally the credential manager looks like the following:

Downloading a GitHub Pull Request

  1. Open an open pull request on GitHub which normally has the following format:
  2. Open a terminal for running a git command (e.g. bash, cmd, powershell, etc...).
  3. Navigate to the location where your git forked repository was cloned.
  4. Download a copy of a pull request using the following command:
    git fetch upstream pull/<ID>/head:<NEW BRANCH>

    Where the variables can be describe as the following:

    <ID> This is the associated code attached to the pull request. Normally has the following format #<ID> (e.g. #123) or see the format from step 1.
    <NEW BRANCH> This is the unique desired branch name on your fork.
  5. Switch to the new branch and do what you want (e.g. code review, testing) using the following command:
    git checkout <NEW BRANCH>
« Older posts